Contents
Every affiliate marketer needs a starting point. And in most cases, that’s your affiliate marketing website.
Your website is the foundation of everything – it’s where your content lives, your audience grows, and those all-important commissions start rolling in.
But don’t worry if you’ve never built a website before. This guide is here to walk you through every step. We’ll cover everything you need to get your site up and running, from choosing the perfect domain name to launching a site that’s ready to bring in traffic (and income).
Along the way, you’ll learn how PrettyLinks simplifies adding and managing affiliate links, letting you spend more time creating content that drives results.
Whether you’re starting from scratch or need a little extra help getting set up, this guide has you covered. Let’s get your affiliate marketing site off the ground!
Why You Need a Website for Your Affiliate Marketing Business (and the Benefits)
If you’re serious about affiliate marketing, having a website isn’t optional – it’s essential. Your website serves as the hub for your business, providing a centralized place to share content, engage your audience, and promote affiliate products.
Unlike relying on social media or other platforms, a website gives you complete ownership and control over your content and brand.
One of the biggest benefits of having a website is that it builds credibility. When visitors land on a well-designed, professional site, they’re far more likely to trust your recommendations.
A blogging website allows you to create valuable content (like reviews, tutorials, and guides) that attract readers and drive organic traffic from search engines. This steady flow of visitors increases your opportunities to earn commissions.
A website also allows you to leverage SEO (search engine optimization) to bring in free, targeted traffic over time. By optimizing your blog posts with the right keywords, you’ll attract readers actively searching for the products you promote, which often leads to higher conversions.
Additionally, a website gives you the flexibility to use tools like PrettyLinks to manage and optimize your affiliate links. Tools like these allow you to track clicks, shorten messy URLs, and improve the user experience, all of which contribute to increased revenue.
Ultimately, a website isn’t just a platform; it’s the foundation of a scalable affiliate marketing business. It’s where you’ll build an audience, establish authority, and turn clicks into long-term income.
What You Need to Set Up Your Affiliate Marketing Website
Before you can launch your affiliate marketing website, you need a few essentials to get up and running:
1. Domain Name: Your domain name is your website’s address –like www.myaffiliatesite.com. It’s how visitors find you. So pick something short, memorable, and relevant to your niche.
2. Hosting Provider: A hosting provider is like renting space for your website on the internet. It stores all your content, images, and files, and ensures your site is accessible 24/7 to visitors around the world.
3. CMS (Content Management System): A content management system, like WordPress, is the tool you’ll use to create and manage your blog. It’s user-friendly, requires no coding skills, and makes it simple to design and update your site.
The good news? You don’t need to juggle multiple platforms to get these essentials.
Bluehost offers everything you need – domain registration, reliable hosting, and seamless WordPress integration – all in one place. With nearly 20 years of experience and over 2 million websites hosted, they’re a trusted choice for beginners and pros alike.

How to Create a Website for Affiliate Marketing
Here’s how you can set up an impressive affiliate marketing site with a little help from Bluehost.
Step 1: Select Your Bluehost Plan
Bluehost offers hosting plans that are beginner-friendly and perfect for WordPress users who want a smooth, hassle-free setup.
Each plan comes with essential features like a free domain for the first year, one-click WordPress installation, and dependable customer support to guide you whenever you need help.
Plus, as your blog grows, their flexible plans make it easy to upgrade, ensuring you always have the right tools without overspending.
Take a look at Bluehost’s hosting options and select the plan that best suits your goals. Once you’re set, it’s time to move on to the next step: giving your affiliate marketing website a name.
Step 2: Choose a Domain Name
Your domain name is your brand in action. A name that’s clear, relevant, and easy to remember can help your affiliate marketing website stick in people’s minds.
Pro tip: Try to keep your domain name short, easy to spell, and relevant to your content. A clean, memorable domain makes it easier for visitors to return and share your site with others!
Start by brainstorming a few ideas, then check if your chosen domain is available. If you’re stuck, tools like Namecheap’s Domain Name Generator can help spark ideas.
Already have a domain registered with another provider? No problem! Bluehost makes it easy to connect an existing domain. Just check the option labeled “I want to use a domain I already own“.

Once you’ve secured the perfect domain, the next step is to continue to checkout where you’ll provide your personal and billing information to finalize your account.
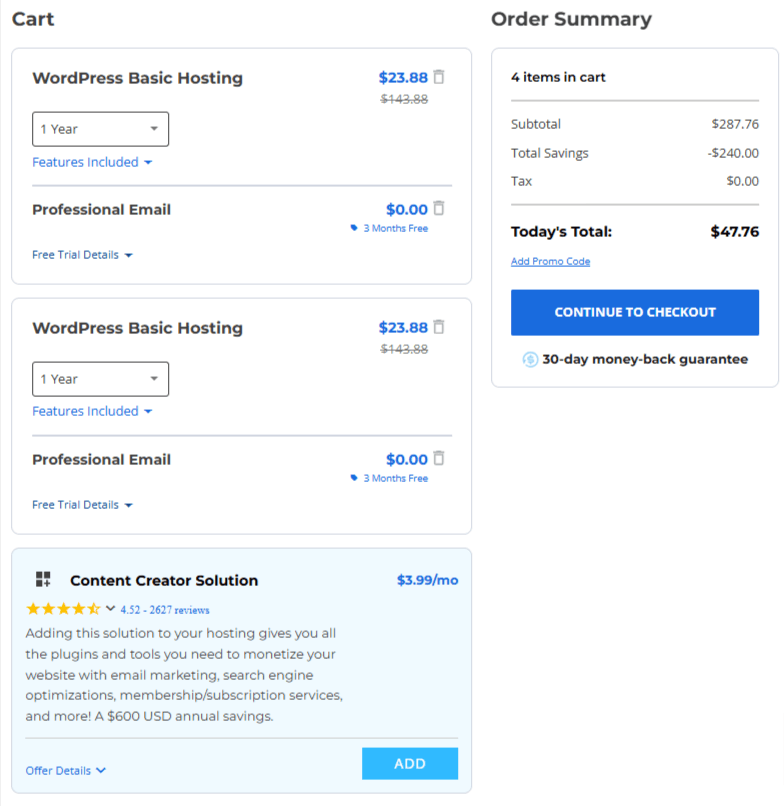
With your domain in place, you’re ready to move closer to launching your affiliate marketing blog.
Step 3: Start Exploring WordPress Through Your Bluehost Dashboard
Once you’ve completed your payment, Bluehost will guide you to your dashboard. Think of it as your command center, where you can access, monitor, and customize your site with ease.
To get started, look for the “Log in to WordPress” button on the right side of your screen. With one simple click, Bluehost will seamlessly take you to the WordPress backend, so you can start building your site right away:
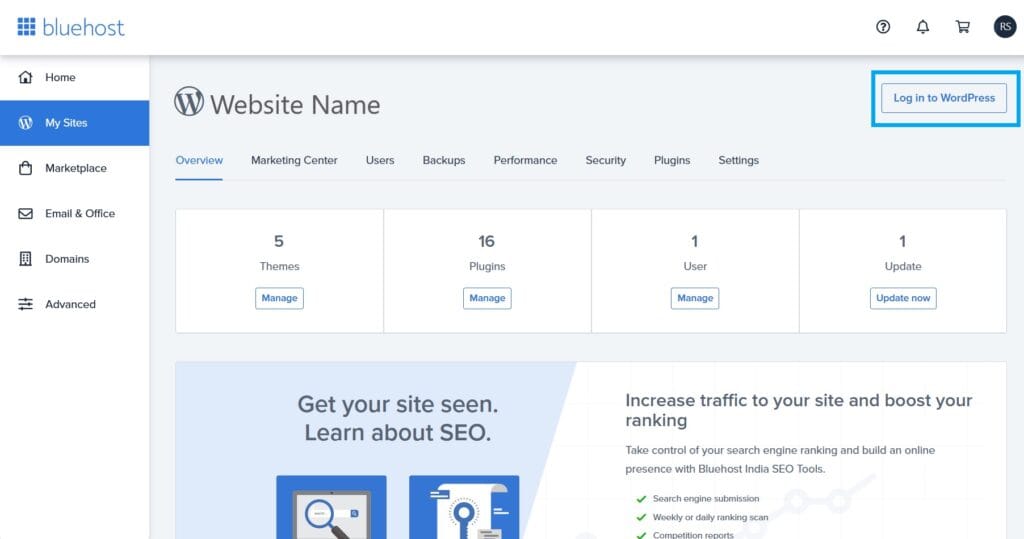
Bluehost also provides a helpful setup wizard that walks you through the basics of WordPress. Whether you’re selecting a theme, creating pages, or customizing your design, the wizard ensures you can hit the ground running, even if you’re completely new to website building.
Take a moment to explore the WordPress dashboard:
- Familiarize yourself with the menu options like Posts, Pages, and Appearance.
- Test out the customizer to adjust themes, fonts, and layouts.
- Start brainstorming your first blog post or key pages, like your “About” or “Contact” page.
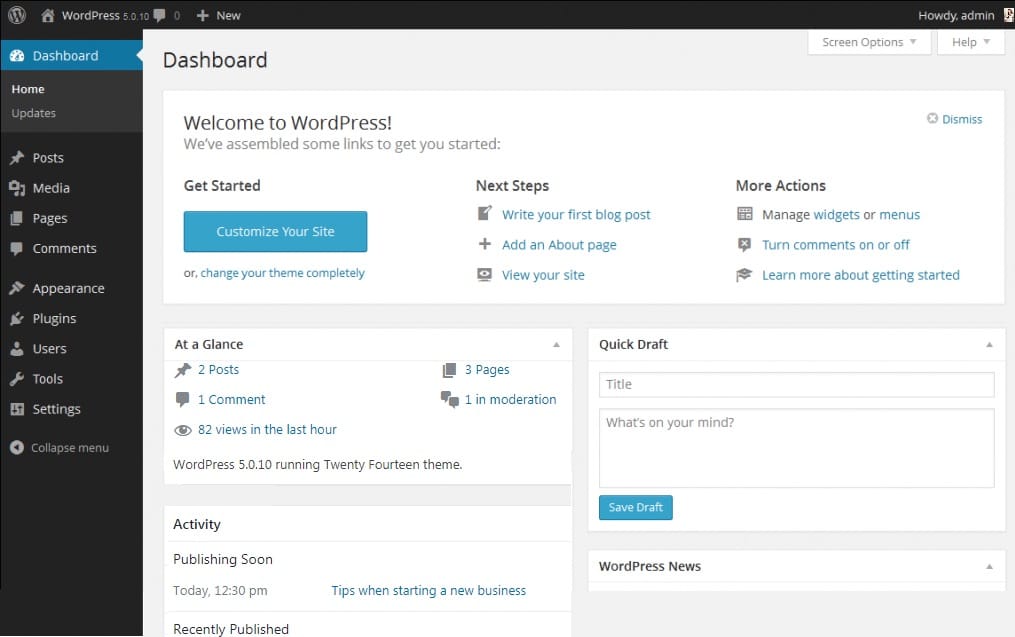
With Bluehost’s easy-to-navigate tools and WordPress’s beginner-friendly interface, you’ll be ready to bring your affiliate marketing blog to life in no time.
Step 4: Select a WordPress Theme
Now it’s time to give your website its own unique look by selecting a WordPress theme. Your theme determines the overall design, layout, and feel of your blog.
WordPress offers a wide variety of themes to match every style and purpose, from clean and minimalistic to bold and vibrant. You’ll find both free and premium options, so whether you’re starting on a budget or ready to invest in a polished design, there’s something for everyone.
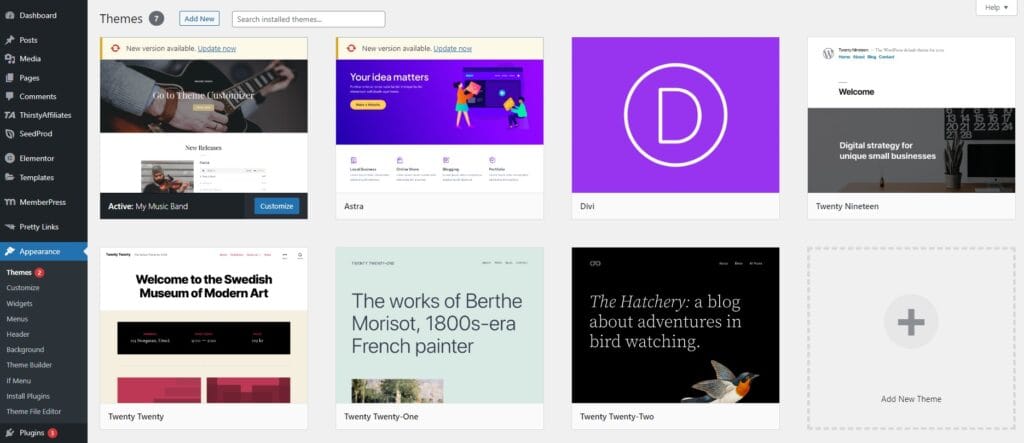
To browse and install themes, follow these steps:
- Go to your WordPress dashboard.
- On the left sidebar, click Appearance > Themes.
- Explore the available themes or use the search bar to find one that fits your vision.
Once you find a theme you like, hover over it and click “Install”. After installation, hit “Activate” to apply it to your site.
Pro tip: Choose a theme that’s mobile-friendly (responsive) and lightweight for faster load times. This ensures a better user experience and can even help with SEO.
Remember, you can always customize your theme later to match your brand by adjusting colors, fonts, and layouts through the WordPress Customizer. Take your time to explore, and pick the theme that feels just right for your affiliate marketing website.
Step 5: Install the PrettyLinks Plugin
With your site live and your theme in place, the next step is setting up the tools that make your affiliate marketing efforts easier. Managing your links is going to be a big part of running your affiliate marketing website, and that’s where PrettyLinks comes in.
PrettyLinks makes affiliate marketing easy for bloggers and creators by providing a simple way to manage, organize, and add affiliate links to their websites.
More Features PrettyLinks has to Offer:
- Link Branding and Cloaking: Turn clunky, complex URLs into short, polished links that look professional and boost trust with your audience.
- Centralized Link Management: Store, organize, and retrieve all your affiliate links from one user-friendly dashboard – no more hunting for the right link.
- Advanced Link Tracking: Monitor clicks and performance to see what’s working and fine-tune your content strategy for better results.
- Automated Keyword Replacement: Automatically link specific keywords in your content to affiliate URLs, saving you time and improving your monetization.
- Link Health Reporting: Keep your links active and functional to ensure a seamless experience for users and maintain trust.
- Integrated Analytics: Access detailed reports directly from your WordPress dashboard via MonsterInsights to track clicks, conversions, and performance.
As an affiliate marketer, having the right tools can make all the difference – and PrettyLinks is one you can’t do without. This powerful plugin helps you keep your links organized, track performance, and save valuable time, so you can focus on what matters most: creating content and growing your affiliate income.
Step 6: Fill Your Affiliate Site with Content
Now it’s time to fill your affiliate marketing website with something your readers can engage with: content! Compelling, valuable content is the heart of your affiliate marketing blog – it connects your audience to the products you promote, builds trust, and ultimately drives conversions.
Here are some content types to consider, each tailored to meet your audience’s needs:
- Review Posts: Offer in-depth insights into products, adding your personal perspective to help readers make confident buying decisions.
- Guides: Show how products work and highlight their value with step-by-step explanations or tutorials.
- List Articles: Share quick, digestible lists of products or tips, perfect for readers who prefer skimmable content.
- Comparison Articles: Break down the pros and cons of similar products to help readers choose the best option.
Once your content is ready, it’s time to make it discoverable with SEO.
Start with keyword research to identify the words and phrases your audience uses when searching for the products you’re promoting. Tools like Google Keyword Planner or SEMrush can help you find high-value keywords.
From there, integrate your keywords naturally into your content, including headlines, body text, meta descriptions, and image alt tags. This ensures your content ranks higher in search results, driving more targeted traffic to your site.
By combining great content with smart SEO, you’ll build a site that attracts readers, keeps them engaged, and increases your affiliate earnings.
Step 7: Place Affiliate Links in Your Site’s Content
Your content is ready, but now it’s time to make it work for you by adding affiliate links. You want to be sure to integrate affiliate links in a way that feels natural and useful, not distracting or forced.
When done well, affiliate links enhance the reader experience while leading to more clicks and conversions.
- Keep It Natural: Add links where they make sense in the flow of your content. Hyperlink product names or relevant phrases instead of using awkward “click here” prompts.
- Focus on Value: Use descriptive links that make it clear what readers will get – like “Learn more about this all-new gadget” instead of a generic link.
Manually adding links works when you’re starting out, but it’s not sustainable as your blog grows. PrettyLinks makes this process effortless with features like automatic keyword linking, which turns relevant words in your posts into affiliate links across your site.
How to Automatically Replace Keywords and URLs Using PrettyLinks
Whether it’s older content or new posts, you’ll never miss an opportunity to monetize with PrettyLinks!
Step 8: Disclose Your Affiliate Links
Adding affiliate links is a great way to monetize your affiliate marketing website, but it’s important to let your readers know about them. Not only is this a matter of trust and transparency –it’s often a legal requirement.
A clear, simple affiliate disclosure keeps you compliant and ensures your readers understand your relationship with the products you promote. Here’s an example you can use:
“This article contains affiliate links, meaning I may earn a commission –at no extra cost to you – if you make a purchase through these links.”
Where you place your disclosure is up to you:
- Add it at the top or bottom of any post containing affiliate links.
- Create a dedicated disclosure page and link it in your site’s footer or navigation menu for easy access.
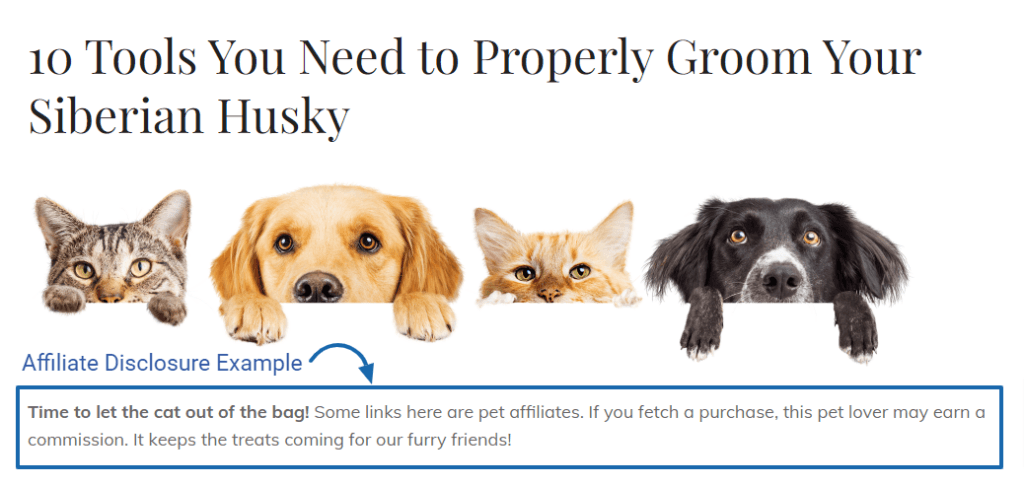
PrettyLinks can help streamline affiliate link disclosures too, saving you time and effort. You can customize the placement and appearance to fit your blog’s style while ensuring your readers always see the message.
Ready to make your affiliate links compliant and professional? Here’s how to set it up >>
With your disclosure in place, you’ll build trust with your audience while staying on the right side of affiliate marketing guidelines.
Conclusion
Congratulations! You’ve built your affiliate marketing website, created valuable content, and optimized it with tools like PrettyLinks to keep your links clean, organized, and effective. But this is just the beginning.
Now it’s time to focus on what brings your blog to life – consistency and growth. Keep creating content that solves problems, answers questions, and connects with your audience. Use your affiliate links thoughtfully to ensure they add value, not noise.
Your blog isn’t just another website – it’s a long-term investment that can grow alongside you. Stay patient, keep learning, and tweak your strategies as you go. Before long, you’ll start to see your efforts pay off with engaged readers and those first commissions rolling in.
So, celebrate this first big milestone – you’ve built something great. Now it’s time to nurture it and let it thrive!





Leave a Reply