Contents
When you’re redesigning your website or updating old content, you may need to change a page’s URL. However, this can have a disastrous impact on the visitor experience and your search engine optimization (SEO).
Fortunately, URL redirects help ensure that your readers and search engines will have no problems finding your content, even after changing its location. URL redirects enable you to make drastic changes to your website’s structure without throwing Google and your audience into confusion.
In this article, we’ll look at what URL redirects are and the benefits of using them as an affiliate marketer. Finally, we’ll show you how to implement a redirect in three easy steps. Let’s get started!
An Introduction to URL Redirects
URL redirects let you make a single web page accessible by creating links that direct visitors to the target content. You can use them to forward users from one page of your website to another, as well as to a completely different site. The latter can be particularly useful if you migrate to a new domain and don’t want to lose traffic.
To help protect your brand identity, you may want to purchase multiple extensions for the same domain name. For instance, you could buy mydomain.com, mydomain.co.uk, and mydomain.net. Then you could use redirects to point all visitors to the same domain extension.
Link redirects can be temporary or permanent. Permanent redirects enable the passing of “link juice“, making them a solid choice if you don’t expect the target URL to change. If you’re unsure about a link’s future, you can set up a temporary redirect instead.
How URL Redirects Can Help Affiliate Marketers
URL redirects can help improve your click-through rates (CTRs). Most affiliate links contain codes that merchants use to track any traffic you send their way. This is key to earning a commission, but it can also result in unsightly links.
Asking your readers to interact with long, complex, and seemingly untrustworthy URLs can raise alarms. A security-conscious visitor may wonder whether the link is safe. However, replacing complicated affiliate URLs with clearer redirects can improve the visitor experience and boost your CTRs.
Redirects can also protect you against link theft. This is when an unscrupulous individual removes or swaps your affiliate link before your merchant partner registers a successful conversion, resulting in you missing out on commissions.
When you set up URL redirects, your affiliate link isn’t visible in the page’s Hypertext Markup Language (HTML). This makes it more difficult for a nefarious third party to tamper with it.
URL redirects can also help you avoid search engine penalties. Search engines have complex algorithms that consider various factors, including the number of affiliate links on your website. Although there’s no specific guidance on how many you can include per page, we recommend only using a small number of relevant ones.
How to Perform a URL Redirect in WordPress (In 3 Steps)
Now that we’ve discussed how URL redirects can be powerful tools for affiliate marketers, let’s see how to implement one in three simple steps.
Step 1: Download Our PrettyLinks Plugin
The easiest way to set up a URL redirect is to use a tool such as our PrettyLinks plugin:

Our link shortener plugin provides a variety of customization options and lets you set up redirects in no time. It’s also available in both a premium and a free version.
Once you download it, you can add it to your site by navigating to Plugins > Add New > Upload File from your WordPress admin area. After it’s activated, the plugin will add a PrettyLinks menu item to your dashboard.
Step 2: Create a Pretty Link
The next step is to add a new “Pretty Link”. To get started, navigate to PrettyLinks > Add New:
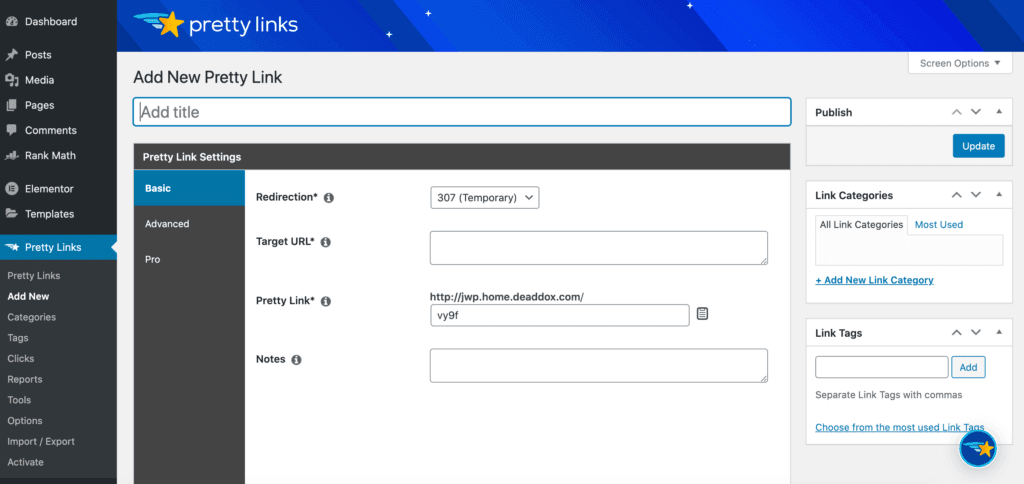
It’s a good idea to give your link a descriptive title. This information isn’t displayed as part of your redirect, but it can help with link management.
If a product link expires or a merchant changes its affiliate program, you may need to edit your redirects. Creating a descriptive title now will make it easier to locate and edit in the future.
Next, you can enter your target URL and choose a redirect type from the Redirection drop-down menu. PrettyLinks supports a range of options, including “Pretty Bar“, cloaked links, and pixel:
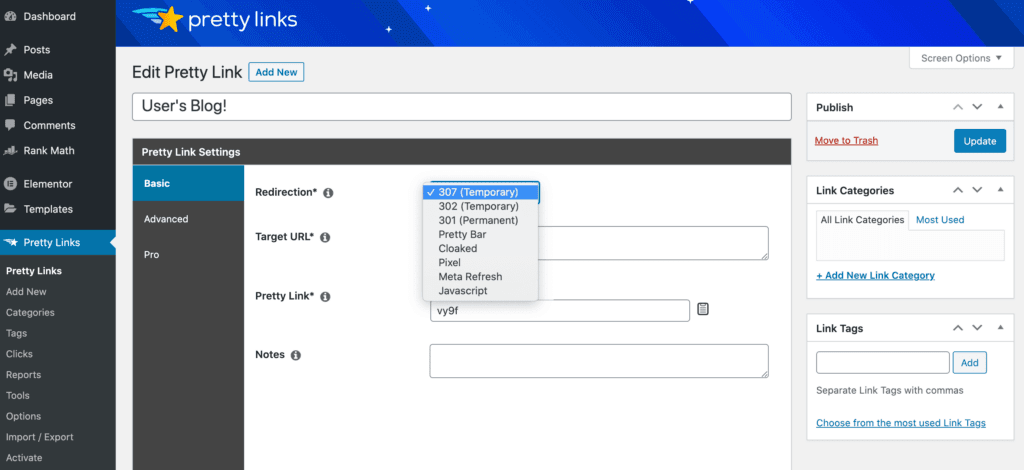
A 301 permanent redirect is the option to use if you want the URL to pass link juice. Meanwhile, a 307 temporary redirect tells search engines that the URL may change in the future.
This prevents search engines from passing along any link juice. If you’re using a 307 Temporary redirect, it’s important to prevent search engines from indexing your links by enabling “nofollow”.
Another popular choice is the 302 temporary redirect, which lets search engines know that a website or page has been moved temporarily. You can use this type if you’re planning to re-route users for a short period of time, such as if you’re updating a live website.
Step 3: Add Attributes to Your URL Redirect
Since it’s an advanced link management plugin, PrettyLinks provides many ways to customize your redirects. You can explore these options under the Advanced tab:

As an affiliate marketer, you’ll often link to a large number of external web pages. This means you may want to consider adding the nofollow attributes to your HTTP redirect header.
Search engines compile your site’s link profile based on many factors, including the sites you link to. By using the nofollow attribute, you can prevent search engine bots from following your external links. This can help you avoid any search engine penalties associated with the websites you’re pointing to.
When you’re happy with your link, you can click on the Update button. Now PrettyLinks will generate your redirect, ready for you to use!
Conclusion
As a site owner, there may be situations in which you need to change a page’s URL. If this process is mishandled, it can make it impossible for search engines and visitors to find your content.
Fortunately, with the right tool, setting up URL redirects is quick and easy. In this article, we discussed how you can do this in three quick steps:
- Download and install our PrettyLinks plugin on your website.
- Create a new “Pretty Link”.
- Add attributes to your URL redirect.
Do you have any questions about how to perform a URL redirect in WordPress? Let us know in the comments section below!


Leave a Reply