
Contents
It goes without saying that if your site isn’t ranking well on major search engines, nobody will be able to find you. If you’ve worked hard at improving your ranking, then change your URL or move your website, it can all be unraveled in a flash.
301 redirects automatically send visitors and search engines to your new URL, and making appropriate use of them is vital for maintaining your current search ranking. What’s more, plugins such as PrettyLinks can make implementing them a snap.
In this post, we’ll explain what 301 redirects are, the process of implementing them manually, and how PrettyLinks can help. Let’s get started!
What 301 Redirects Are
Put simply, a 301 redirect is a permanent redirection from one URL to another – such as www.yoursite.com/version1 to www.yoursite.com/version2. The number refers to the HTTP status code for this type of redirect. Once implemented, any visitor or search bot visiting the original URL would be funneled directly to the new one.
It’s worth pointing out that 301 redirects should only be used as a means for permanent redirection, and is normally used to preserve the user’s experience while search engines catch up with your changes.
Why You Should Use 301 Redirects
Changing your URL without using a 301 redirect is similar to moving your business to a new address and not notifying customers. They’ll keep turning up to the old location for a while, but after some time, will eventually go elsewhere – leaving your business in ruins.
It’s the same thing with Search Engine Optimization (SEO) – if no one knows where to find you, you can’t gain traffic.
When moving domain, 301 redirects are ideal for the following reasons:
- You can resolve different URLs to the same location. People have their individual habits when it comes to inputting web addresses – some preferring to enter www, others not. 301 redirects make sure all instances take visitors to the right site.
- You can rebrand a website with a different URL. There are a myriad of reasons to change your URL. Whatever the reason, you can do this while preserving most of your PageRank.
- You can redirect traffic from different URLs owned by the same company. Some companies may need multiple domains to redirect to the same site. With 301 redirects, you’re free to do so.
While using 301 redirects isn’t rocket science, it can be confusing if you haven’t done it before. Don’t sweat it – we have you covered! Let’s take a look at how to do it.
How to Implement 301 Redirects on Your Website
Implementing 301 redirects manually is normally carried out through your .htaccess file. In short, this is a server configuration file that stores important settings related to your WordPress website. It can be found within your site’s root directory (normally called public_html or www), or in the top-level directory of your WordPress installation.
You’ll certainly need to access your site via File Transfer Protocol (FTP) in order to edit .htaccess. In this article, we’ll be using the popular (and free) FileZilla application. If you’re uneasy about using FTP, consult both the documentation and your web host’s instructions before you get cracking.
Once you’re logged into your server, you may not see your .htaccess file. That can be remedied by selecting Server > Force showing hidden files from the FileZilla menu.
If you’re still struggling, you may not even have a .htaccess file. To fix this, log into your WordPress dashboard, navigate to Settings > Permalinks, choose any of the permalink settings, then save your changes. This forces WordPress to create a new .htaccess file. Make sure you revert back to your original permalink settings afterward!
From here, you’ll want to carry out one more task before getting started: backing up your site.
Simply put, you should always back up before making any changes to your WordPress installation. That way, you have a good, clean version of your site to revert to in case the worst happens. Our recommendation is the UpdraftPlus plugin:

Using the plugin is a breeze – so there’s really no excuse for skipping this step. Alternatively, you can also opt for a premium option, such as VaultPress.
Next, log into your server using FileZilla, locate your .htaccess file, and edit it using your favorite plain text editor – any other application could potentially ‘break’ it. It’s important not to edit any pre-existing code too (i.e. everything between BEGIN WordPress and END WordPress).
To implement a 301 redirect, you’ll need to add the following code to the very bottom of your file:
# BEGIN 301 Redirects
Redirect 301 /old-post/ http://www.yourwebsite.com/new-post/
# END 301 Redirects
Simply replace /old-post/ with your old URL, then add the new URL to replace http://www.yourwebsite.com/new-post/. Save your changes, and that’s it!
How PrettyLinks Can Help With 301 Redirects
Our PrettyLinks plugin is more than just another URL shortener. It enables you to shorten, shrink, cloak, track, organize, share, and test all of your links.
In addition to shortening your URLs, PrettyLinks also offers multiple redirect options, including 301 redirects – all set directly from within your WordPress dashboard:
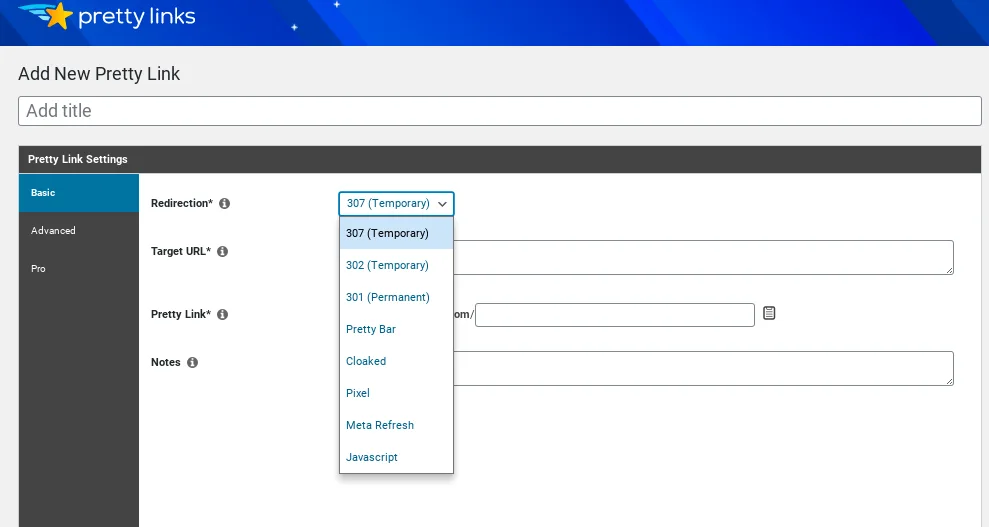
So, while the manual method has its place, PrettyLinks offers just as much power, without you having to touch a single line of code.
Conclusion
Moving your website or changing your URL can wreak havoc with your search engine rankings. It’s a good job, therefore, that 301 redirects can help reduce the pain involved. What’s more, PrettyLinks can help you implement them on your site quickly and easily.
In this post, we’ve shown you how to implement 301 redirects manually on your site. Let’s recap the necessary steps:
- Back up your site (we recommend UpdraftPlus or VaultPress).
- Log into your server via FTP (with a tool such as FileZilla).
- Add the necessary code to your .htaccess file, and save your changes.
Do you have any questions about 301 redirects or how PrettyLinks can help? Ask away in the comments section below!
If you liked this article, be sure to follow us on Facebook, Twitter, and LinkedIn! And don’t forget to subscribe to our newsletter.