
Contents
Links are commonplace in online marketing campaigns and content, including blog posts, landing pages, and email newsletters. As such, you may worry if your readers are tuning your links out completely. This would dilute your links – making them ineffective, especially if you use them often.
One solution to this problem is image links, since they enable you to use them in attractive and new interactive ways. In fact, by using them in your content you can improve your Click Through Rate (CTR) by up to 42%!
In this post, we’ll highlight three ways to effectively use image links in your content. We’ll then show you how you can add shortened links to your images with the help of PrettyLinks. Let’s get started!
1. Choose Images That Make Your Links Noticeable

Choosing the right images is a must for any of your content. This is especially true if you want to utilize images for your links. By using a high-quality and related image, you increase the odds of grabbing the reader’s attention and having them interact with it.
To ensure that the images you choose will prompt reader interaction, there are two points to keep in mind. First, keep the images relevant. Those that are related to the content are most likely to draw focus and interaction.
Second, use images that appear clickable. This may be an obvious button icon, or even a regular image with a text overlay that states Click for more information. While you can use an image without any indication of its status as a link, it may not be as effective at engaging readers.
2. Use Image Effects to Make Links Interactive

Just as they sound, image effects are those that add flair to your images. An image effect helps to draw attention to the image, but it can also be used to differentiate your non-linked images from linked ones. For example, adding the effect of fading to linked images encourages readers to interact with it.
There are two ways to add effects to your images. The first is a manual process that requires some coding experience. The second involves the use of plugins such as Amazing Hover Effects or NextGen Gallery.
The former offers 76 hover effects (including fades, text overlays, and slides):

On the other hand, NextGen Gallery is a powerful gallery plugin. While effects aren’t its main focus, it does offer a few that users can choose from. By choosing a plugin instead of following the manual process, you’ll have more variety in effects. Additionally, you don’t have to worry about coding errors or a drawn out process.
3. Implement A/B Testing to Find Best Image Link Placements
A/B testing is a marketing technique that helps you compare elements on your website. Just like regular links, image links will perform better in different locations. With A/B testing, you can pinpoint these placements and use them going forward. The importance of A/B testing cannot be overstated. It enables you to gain a deep understanding of your readers.
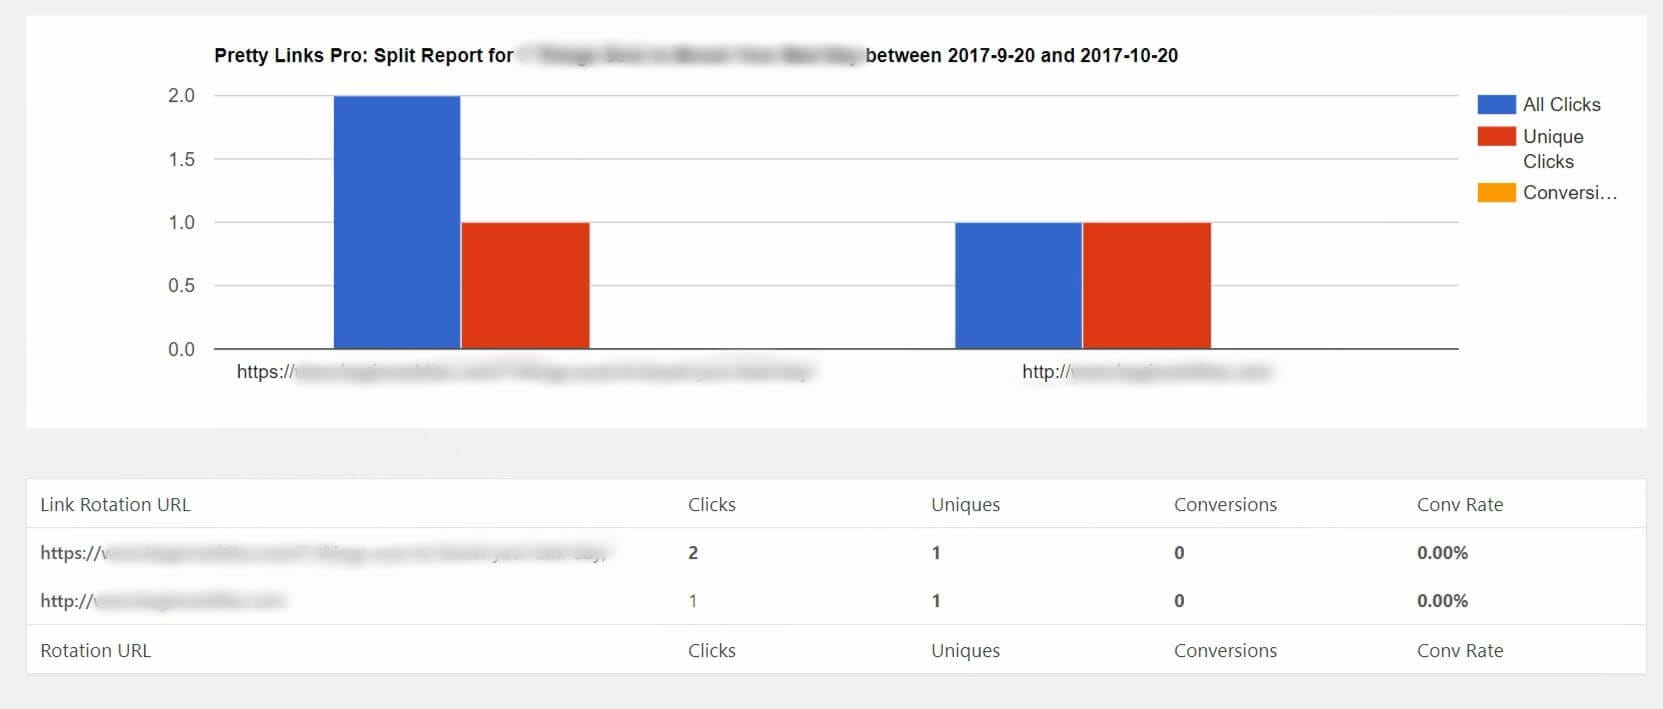
Fortunately, PrettyLinks makes setting up your A/B tests simple. With this feature, you can practice full split testing and test more than just iterations of your image links. Even more importantly, the the Split Test Report is easy to decipher, and you can use the results immediately to make changes to your campaigns.
How to Add PrettyLinks to Your Images

PrettyLinks is a link management plugin that enables you to create shortened, branded links. It’s also an excellent tool to use when creating image links. This is because it enables link tracking (for A/B testing) and even offers conversion reports.
Creating pretty links is simple. Though, adding that shortened link to your images can be a bit tricky if you aren’t familiar with HTML. To achieve this, navigate to the back end of your website, and find the post or page where the image is located. Switch from the Visual to Text editor, and find the code that starts with <img src>. If you have more than one image in your post, you can double check which it is by looking at the title:

Next, simply add two snippets of code around the existing element. Place your cursor before <img src and add <a href=”yourlink.com”>. Replace yourlink.com with the actual link. Next, go to the very end of the image code and add </a>:

When you now Publish your page or post, the image will be linked. Readers can click on the image and be brought to the target URL you’ve selected.
Conclusion
Whether you’re an affiliate marketer or a blog owner, links are a crucial addition to your content. Unfortunately, their frequent use can mean they blend into the background and lose their effect. However, image links can solve this problem by incorporating color and purpose to revitalize your links.
In this post, we’ve shown you how to add pretty links to your images. We’ve also outlined three ways to use image links most effectively in your marketing campaigns. To recap, they are:
- Choose eye-catching images to make your links noticeable.
- Use image effects to make hyperlinks interactive.
- Implement A/B testing to find best image link placements.
Do you have any questions about image links, or how you can use PrettyLinks to create them? Let us know in the comments section below!


Leave a Reply