How to Set Up Link Expirations Using Pretty Links
Contents
Link expirations are incredibly useful and an awesome feature offered by Pretty Links. However, the tool isn't used as often as it could be, due to a lack of understanding of how to use it efficiently.
Fortunately, link expirations are a very simple feature you can use across your website and social media platforms. They can provide you with unmatched control over your links, which enables you to provide different types of offers and content to your website visitors.
In this post, we'll introduce you to link expirations and three reasons why you should use them on your website. Then we'll show you how to set up link expirations in Pretty Links. Let's get started!
What are Link Expirations? (and Why They're Awesome)
Link expirations are links that end on a set date or after a predetermined number of clicks. These expirations are commonly used by marketers and bloggers, as they offer a simple way to protect content and offer limited deals to followers and readers. However, link expirations can also:
- Give you more control over your linking campaigns. With expiring links, you can choose how long a link is available or how many people can click it.
- Provide an easy way to make offers to your readers. Expiring links enable you to make offers available to your readers for a limited time. This means you can keep the number of free offers you're sending out in check.
Link expirations can be used in just about any place on the web. For example, you can add them within emails to your subscribers, on social media accounts, and even on website forums.
3 Reasons to Use Link Expiration on Your Website
With a better understanding of how link expiration can benefit you, let's take a look at common situations when this technique is used on websites and why you should do the same.
1. To Offer a Limited-Time Deal
Many marketers use discounts as a way to improve conversions and increase customer relations. Link expirations control how you offer those discounts. Once they're in place, you can sit back and let the deal play out itself and not have to worry about revoking access at a later time.
To use link expirations optimally, we recommend two steps.
- First, advertise the deal to your audience beforehand.
- Second, choose whether clicks or time will be your expiration parameter. For physical products with limited copies available, we recommend clicks. However, for sales or products with unlimited numbers (such as digital copies), you can choose either option.
2. To Combat Stealing
Another common use for link expirations is to prevent theft. Unfortunately, some customers may look to share exclusive deals or content with others. Expiring links can help cut back on this.
To combat stealing, we recommend password protecting the content found at one expiring link, then using another expiring link that's shared and sends the user to a web page containing the password. It's certainly a complex method, but this way, users will need access to both links, which makes stealing your content more difficult.
Using a reliable password manager can also help by securely storing and sharing these passwords without exposing them to unauthorized users.
3. To Add a Sense of Urgency
Whether you've got a new product coming out or you just want to increase the number of individuals on your email list, a sense of urgency can work in your favor. In fact, urgency has been shown to increase conversions and make your content seem more valuable.
Link expirations are a great tool for creating this urgency, and there are a few ways to achieve it. For example, limiting the number of clicks is more likely to promote a sense of scarcity (and make them seem more valuable). Time-based expiration makes buying your product more urgent.
How to Set Up Link Expiration in Pretty Links
If you're ready to set up link expiration with Pretty Links, you'll be glad to know the process is simple and can be completed in just a few minutes.
First, navigate to the Pretty Links screen on your WordPress dashboard. You can either select Pretty Links from the drop-down to view your existing links or select Add New Link to create a new one:
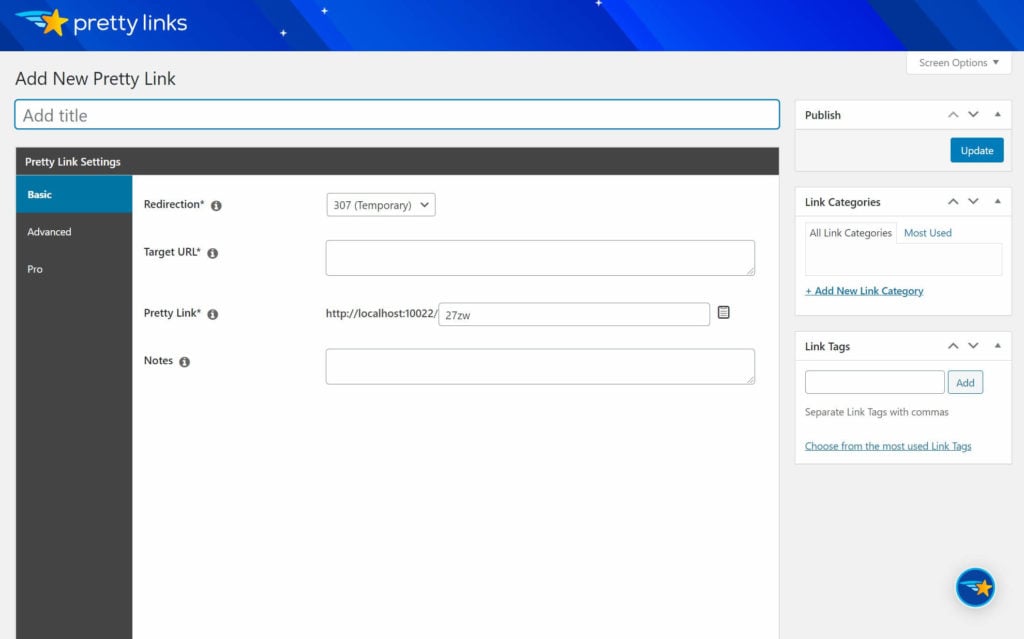
Once you're in the link editor, scroll down to Pro Options and click on it to expand your choices. Simply check the box next to Expire to enable the setting.
Now, you'll notice a few new settings appear. First, Expire After enables you to choose either Date or Clicks. Select whichever option is appropriate for your link and fill out the Date or Clicks box below:
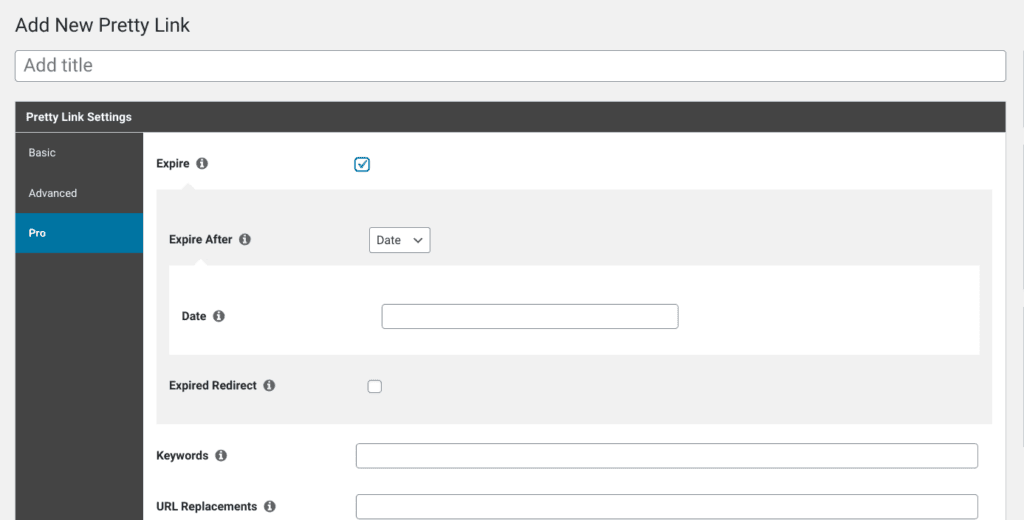
You'll also notice the Expired Redirect checkbox. Once enabled, you can provide a URL that users are directed to once the link has expired. This page could be things like a dedicated Sorry page, your blog, or even a social media account. If this option is not enabled, the user will be sent to a simple 404 error page.
Finally, go ahead and create or edit your Pretty Links. When you're ready, click Create or Save, and the expiring link will be ready to use.
Conclusion
By learning how to use link expirations, you can leverage their benefits. These benefits include better control over your linking campaigns and a potential decrease in content theft by those using the link inappropriately.
In this post, we've offered an introduction to link expirations and three reasons you may want to use them on your website. Additionally, we've shown you how to set up link expirations using Pretty Links. To quickly recap:
- Go to Pro Options on the Add Link page, and enable Expire.
- Select the Expire After option (either Date or Clicks) that works best for your needs.
- Optionally, enable Expired Redirect and add a URL to send users to an expired redirect page.
If you liked this article, be sure to follow us on Facebook, Twitter, Pinterest, and LinkedIn! And don't forget to subscribe to our newsletter!
About John Hughes
John is a blogging addict, WordPress fanatic, and staff writer.