
You may need a brief primer on how Pretty Links handles conversion tracking. Traditionally a “conversion” means a person makes a sale, but as far as Pretty Links is concerned, a conversion can be a click or a hit. That hit could be a sale, a mailing list signup, or a link to another page.
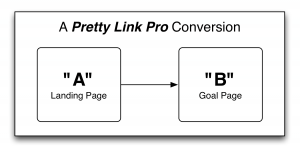
Pretty Links records a conversion when a user does “A” and then later does “B.” “A” is almost always recorded when a user hits a specific landing page, and “B” is the goal page of that landing page, whether a sale or not. Pretty Links then divides the number of hits by the number of conversions to find the conversion rate of “A” — straightforward to set up, and convenient to have automated.
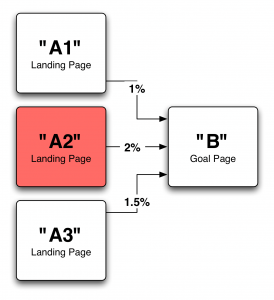
The interesting data comes when you analyze multiple landing pages to see which one drives people to “B” the most. I’ve used this approach to monitor which landing page in a PPC campaign performs best, or which email landing page in a drip campaign (time-delayed autoresponder messages) converts best. It helps me see which strategies are working.
Pretty Links focuses on setting up reports fast and seeing results quickly, giving accurate feedback so you can focus on what to improve now.
Setting Up a Conversion Report
- Go to Dashboard > Pretty Links > Pro Reports.
- Click Add a PrettyLinks Report.
- Name your report.
- Select your Links to Analyze — these are your “A” pages.
- Select your Goal Link — this is your “B” page.
- Click Create.
- Find your new report in the list and click View under it to see the report.

Additional Tips for Reports
- Omit the Goal Link to compare clicks across your “A” pages;
- If the “B” page is not controlled by you (for example, recording a sale on someone else’s system), create a Pretty Link for “B” that is a Tracking Pixel, and ask whoever controls that page to add it. Every time that third-party page loads, your conversion is counted;
- Conversion report data is ongoing — if your “A” and “B” links had previous activity, you’ll see data immediately after creating the report.
Customizing Reports
Pretty Links lets you customize the date range when viewing reports. Select the date range, then click Customize.
