
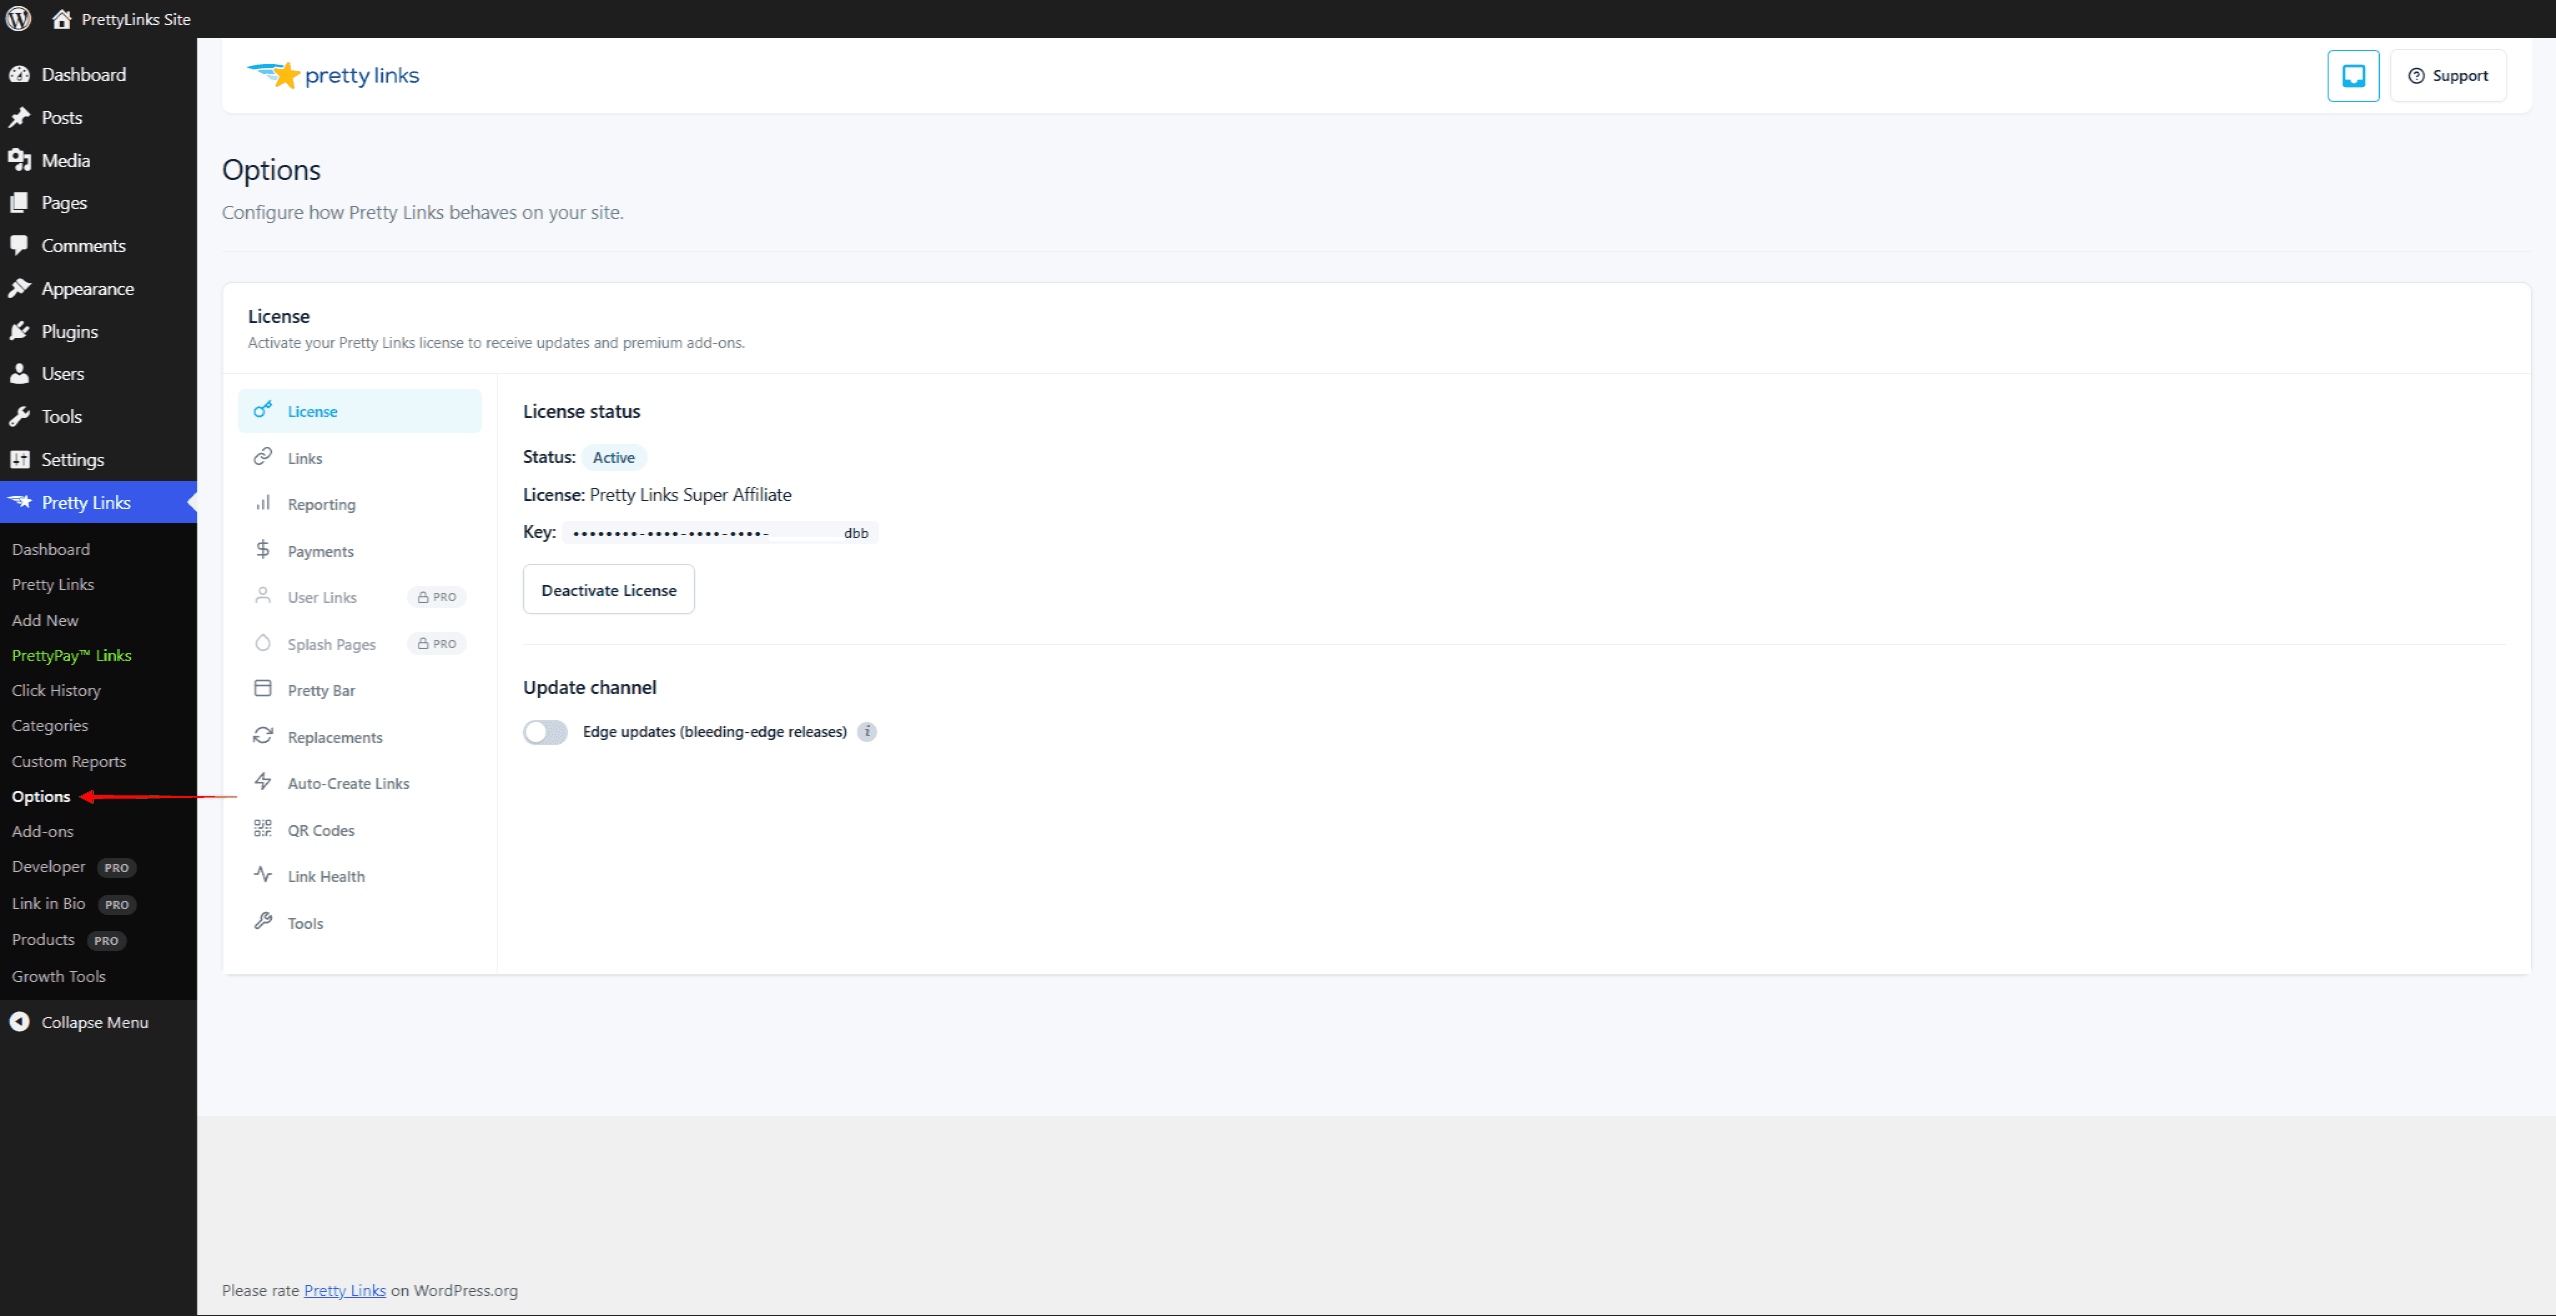
A maior parte da configuração global do Pretty Links fica em Painel > Pretty Links > Opções. A página está organizada em abas, cada uma agrupando configurações relacionadas. Esta página é o seu guia.
Salvar automaticamente
Uma observação rápida antes do tour: a página “Opções” não possui um botão “Salvar”. As configurações são salvas automaticamente cerca de 600 milissegundos (pouco mais de meio segundo) depois que você parar de digitar ou alterar um controle. Você verá um pequeno indicador de confirmação após o salvamento bem-sucedido.
Isso significa que:
- Não espere “desfazer as alterações” ao sair da página — a essa altura, suas alterações já estarão salvas;
- Se você cometer um erro de digitação em um campo essencial, corrija-o antes de sair da página;
- Atualize a página após salvar para confirmar o que foi armazenado, especialmente ao alterar opções confidenciais, como o modo de rastreamento.
As abas
As abas aparecem em uma ordem definida. As seções da versão Lite vêm primeiro — Licença, Links, Relatórios, Pagamentos —, seguidas pelas seções da versão Pro e dos complementos, com Ferramentas sempre dura para sempre.
Licença
Gerencie sua licença do Pretty Links Pro:
- Ativar ou desativar a licença neste site;
- Veja o status da sua licença, o nível do plano e a data de renovação;
- Iniciar uma verificação manual de atualizações;
- Encontre seus recursos de suporte ao cliente.
Esta é a primeira aba que você deve acessar após instalar o Pretty Links Pro em um novo site.
Links
Configurações padrão e regras globais que se aplicam aos novos links personalizados que você criar:
- Tipo de redirecionamento padrão (301 ou 302; 307 está obsoleto);
- Contagem de caracteres do slug para slugs gerados automaticamente;
- Padrões de slugs reservados (com opção de contornar a restrição por parte do administrador);
- Padrão
rel="nofollow"erel="patrocinado"botões de ativação/desativação para novos links.
Veja Configurações padrão de links para mais detalhes.
Relatórios
Rastreamento de cliques e análise de comportamento:
- Controle o botão de ativação/desativação “Rastrear cliques em todos os links por padrão”;
- Modo de rastreamento — Normal, Estendido ou Simples;
- Clique em “Retenção de dados” (janela de exclusão automática);
- Anonimização de endereços IP;
- Filtragem de bots e listas de exclusão/permissão de IPs.
Pagamentos
Conecte o Stripe e configure as opções padrão para os links do PrettyPay™ — links personalizados que coletam o pagamento antes do redirecionamento. Ignore esta aba, a menos que você pretenda monetizar seus links curtos diretamente.
Links públicos (Prós)
Configurações para criação de links públicos:
- Ativar/desativar;
- Prefixo da URL;
- Categoria padrão;
- Controles contra spam.
Esta seção aparece apenas quando há links públicos em uso.
Bar bonito (Prós)
Configurações para o Tipo de redirecionamento “Pretty Bar”:
- Posição (parte superior ou inferior da janela de visualização);
- Altura e cores do balcão;
- Envio do logotipo;
- Título, texto do botão e link padrão;
- Opções de compartilhamento nas redes sociais dentro do bar.
Substituições (Prós)
Controles para palavra-chave e Substituições de URL:
- Diferenciação entre maiúsculas e minúsculas;
- Forçar a atribuição de “nofollow” ou “patrocinado” nas substituições;
- Criar automaticamente URLs desconhecidas;
- Lista global de exclusão;
- Lista de bloqueio de URLs.
Criação automática (Prós)
Configuração para criação automática de links com formato otimizado após a publicação do post:
- Inscrição por tipo de postagem;
- Categoria padrão para links criados automaticamente;
- Estratégia de geração de slugs.
Códigos QR (Prós)
Configurações para Geração de código QR:
- Ativar/desativar códigos QR;
- Formato padrão (PNG / SVG);
- Opções de sobreposição de logotipo.
Link Saúde (Prós)
Configuração para o Verificador de integridade do Link:
- Ativar verificações periódicas;
- Verificar a frequência;
- Preferências de notificação.
Botões sociais (Prós)
Configurações para botões de compartilhamento social:
- Quais botões exibir;
- Posicionamento (superior, inferior, ambos);
- Ativar/desativar por CPT;
- Botão para ativar/desativar o feed RSS.
Links do usuário (Complemento Super Affiliate)
Aparece quando o complemento “User Links” está instalado. Configura o painel de links curtos do front-end para membros conectados. Enquanto o complemento não estiver ativo, a aba é exibida como um teaser bloqueado.
Splash (Complemento Super Affiliate)
Aparece quando o complemento Splash Pages está instalado. São as configurações padrão para o anúncio intersticial com a marca exibido antes dos redirecionamentos. Até que o complemento esteja ativo, a aba é exibida como um teaser bloqueado.
Ferramentas
É sempre a última aba na barra lateral. Contém funções de importação/exportação, utilitários de desempenho e outras operações pontuais que não se encaixam perfeitamente nas outras abas de configuração.
Configuração recomendada para a primeira tentativa
Para uma instalação totalmente nova, percorra as guias mais ou menos nesta ordem:
- Licença — Ativar.
- Links — Defina suas configurações padrão (a maioria dos usuários mantém o tipo de redirecionamento como 302 e decide se os novos links devem ser “nofollow” ou “patrocinados” por padrão).
- Relatórios — Confirme se a opção “Rastrear cliques em todos os links por padrão” está ativada, escolha um modo de rastreamento (o modo “Normal” é o padrão e o mais adequado para a maioria dos casos), habilite o anonimato de IP e configure sua lista de exclusão de IPs com o endereço IP do seu escritório.
- Criação automática — Decida quais tipos de postagem devem gerar links otimizados automaticamente. Ative essa função, no mínimo, para as postagens do blog.
- Substituições — Decida se deseja ativar a substituição de palavras-chave e URLs globalmente. Para novos sites, é mais prudente mantê-las desativadas e adicionar palavras-chave a cada link conforme necessário.
- Botões sociais — Se você quiser botões de compartilhamento nas suas postagens, ative essa opção aqui.
- Barra de opções / Códigos QR / Links públicos — Configure essas opções mais tarde, à medida que for utilizando os recursos.
Você não precisa deixar a configuração perfeita de uma só vez. As configurações podem ser alteradas a qualquer momento e a maioria se aplica aos novos links daqui em diante (os links existentes mantêm suas configurações originais, a menos que você os atualize em massa).
Dicas
- O salvamento automático é rápido, mas não é instantâneo. Aguarde o indicador de confirmação antes de sair desta página;
- A guia “Licença” é a fonte de referência para o nível do seu plano — salve nos favoritos para consultar;
- As configurações desta página se aplicam globalmente. As substituições específicas por link são feitas na própria tela de edição do link;
- Substituições por postagem são configurados por meio do metabox de opções de postagem nas postagens individuais, não aqui.